
- Getting Started Configuration Accessing Your Cluster Hypervisors Maintenance
- Updating croit
- Replacing OSDs
- Replacing NIC
- PG numbers
- Updating Ceph
- Migrating or restoring croit container
OpenID & LDAP
OpenID Connect (OIDC)
Configure your OIDC provider
To integrate croit with your OIDC provider, follow these steps:
-
Add a New Client (Application): In your OIDC provider's dashboard, add a new client for croit. This client is sometimes referred to as an application. Obtain a client ID and optionally a client secret for croit.
-
Configure Redirect URIs: Set up redirect URIs for croit. The redirect URI for croit should be configured as
/oidc.
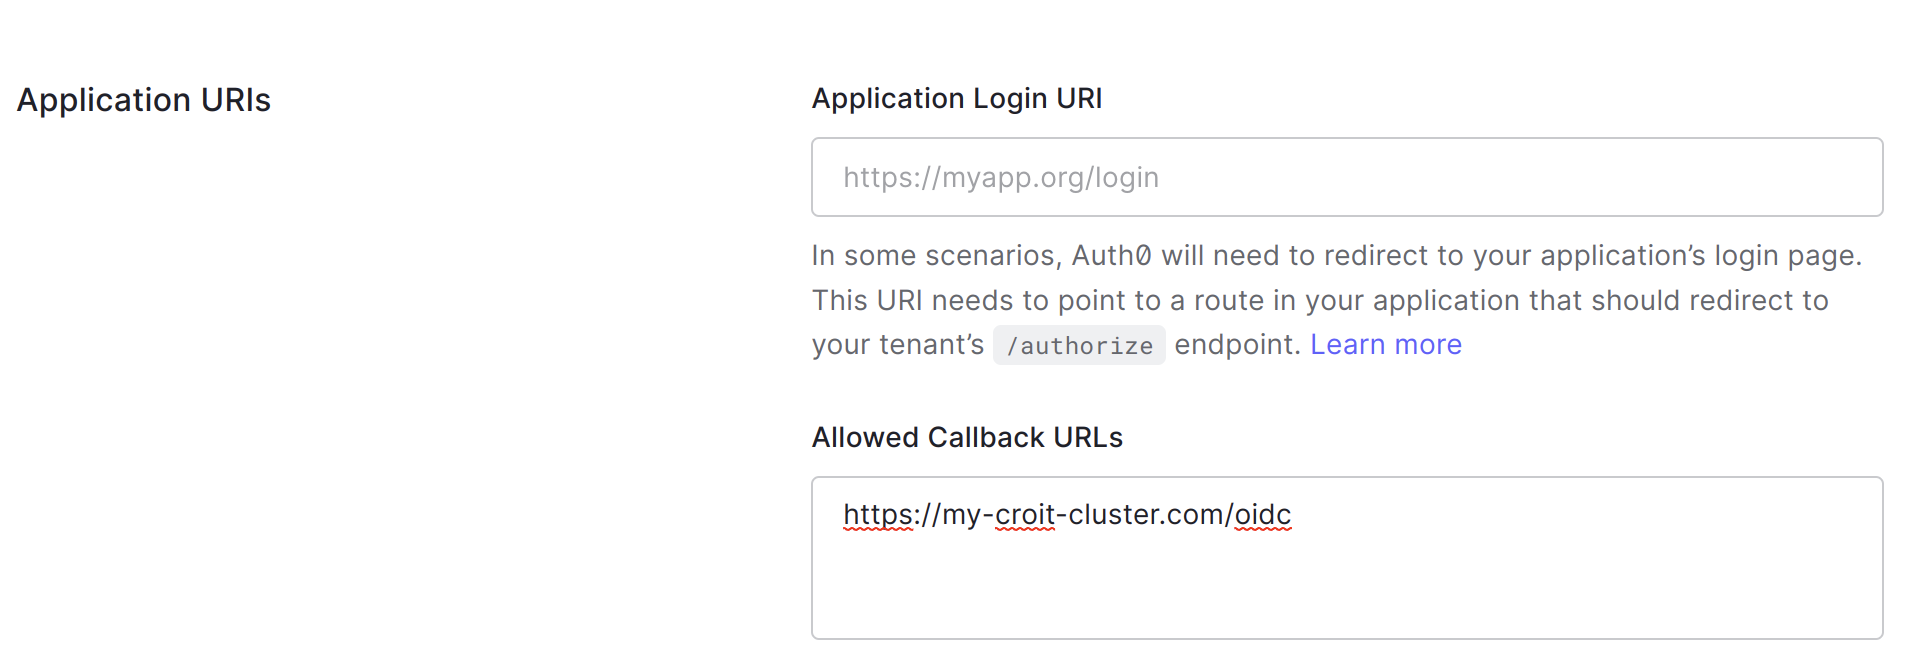 Auth0
Auth0
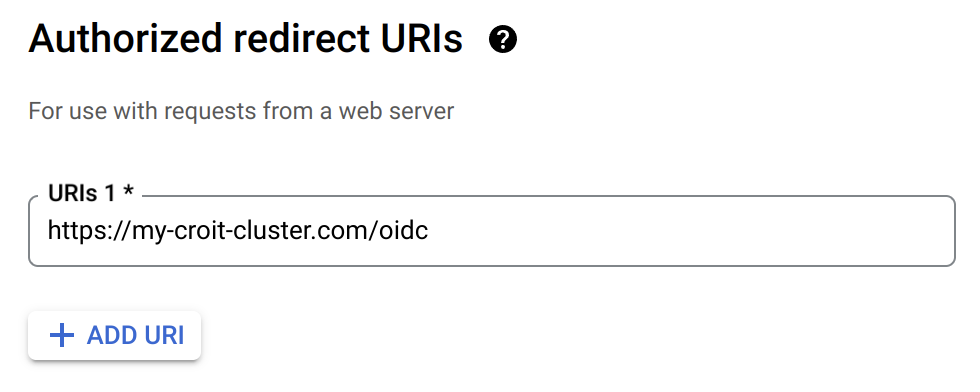 Google
Configuring OIDC Providers in croit
To set up OIDC providers in croit, follow these steps:
-
Navigate to croit -> OpenID
-
Add a New Provider:
- Click on New to add a new OIDC provider.
-
Fill in the Following Fields:
- Name: Enter a human-readable name for this provider, which will be displayed on croit’s login page.
- Discovery URL: Provide the discovery/configuration URL of your OIDC provider. For example, for Google, this would be
https://accounts.google.com/.well-known/openid-configuration. - Client ID: Enter the client ID for the croit app provided by your OIDC provider.
- Client Secret: Optionally, provide the client secret for the croit app. This is required if you use a client authentication method that requires it.
- Client Authentication Method: Choose the method configured for croit at your OIDC provider (e.g., Basic or Post).
- Default roles: Specify croit roles that will be automatically assigned to all users from this OIDC provider.
- Manual roles: Optionally, allow manual assignment of roles to users after their initial login.
- Role claim or JSON pointer: This can either be a claim (e.g. groups, effectively the same as a JSON pointer /groups), or a JSON pointer (e.g. /meta/groups) pointing to a list of roles or groups that the user belongs to, inside the list of claims for the user returned by the OIDC provider. It may also point to a string, which is interpreted as a single role. If you leave this field empty, only the default roles are used (see below). Otherwise, you need to provide a role map that maps the values from the role claim/pointer to croit roles. For example, if the OIDC provider is configured to send the following claims for a user:
{
  "sub": "248289761001",
  "name": "Jane Doe",
  ...
  "meta": {
    "roles": ["siteadmin", "siteviewer"]
  },
}
You may configure /meta/roles as JSON pointer, and add role mappings for siteadmin to Admin and siteviewer to Viewer.
Here’s an example of these settings filled out for Google and Auth0 as OIDC provider:
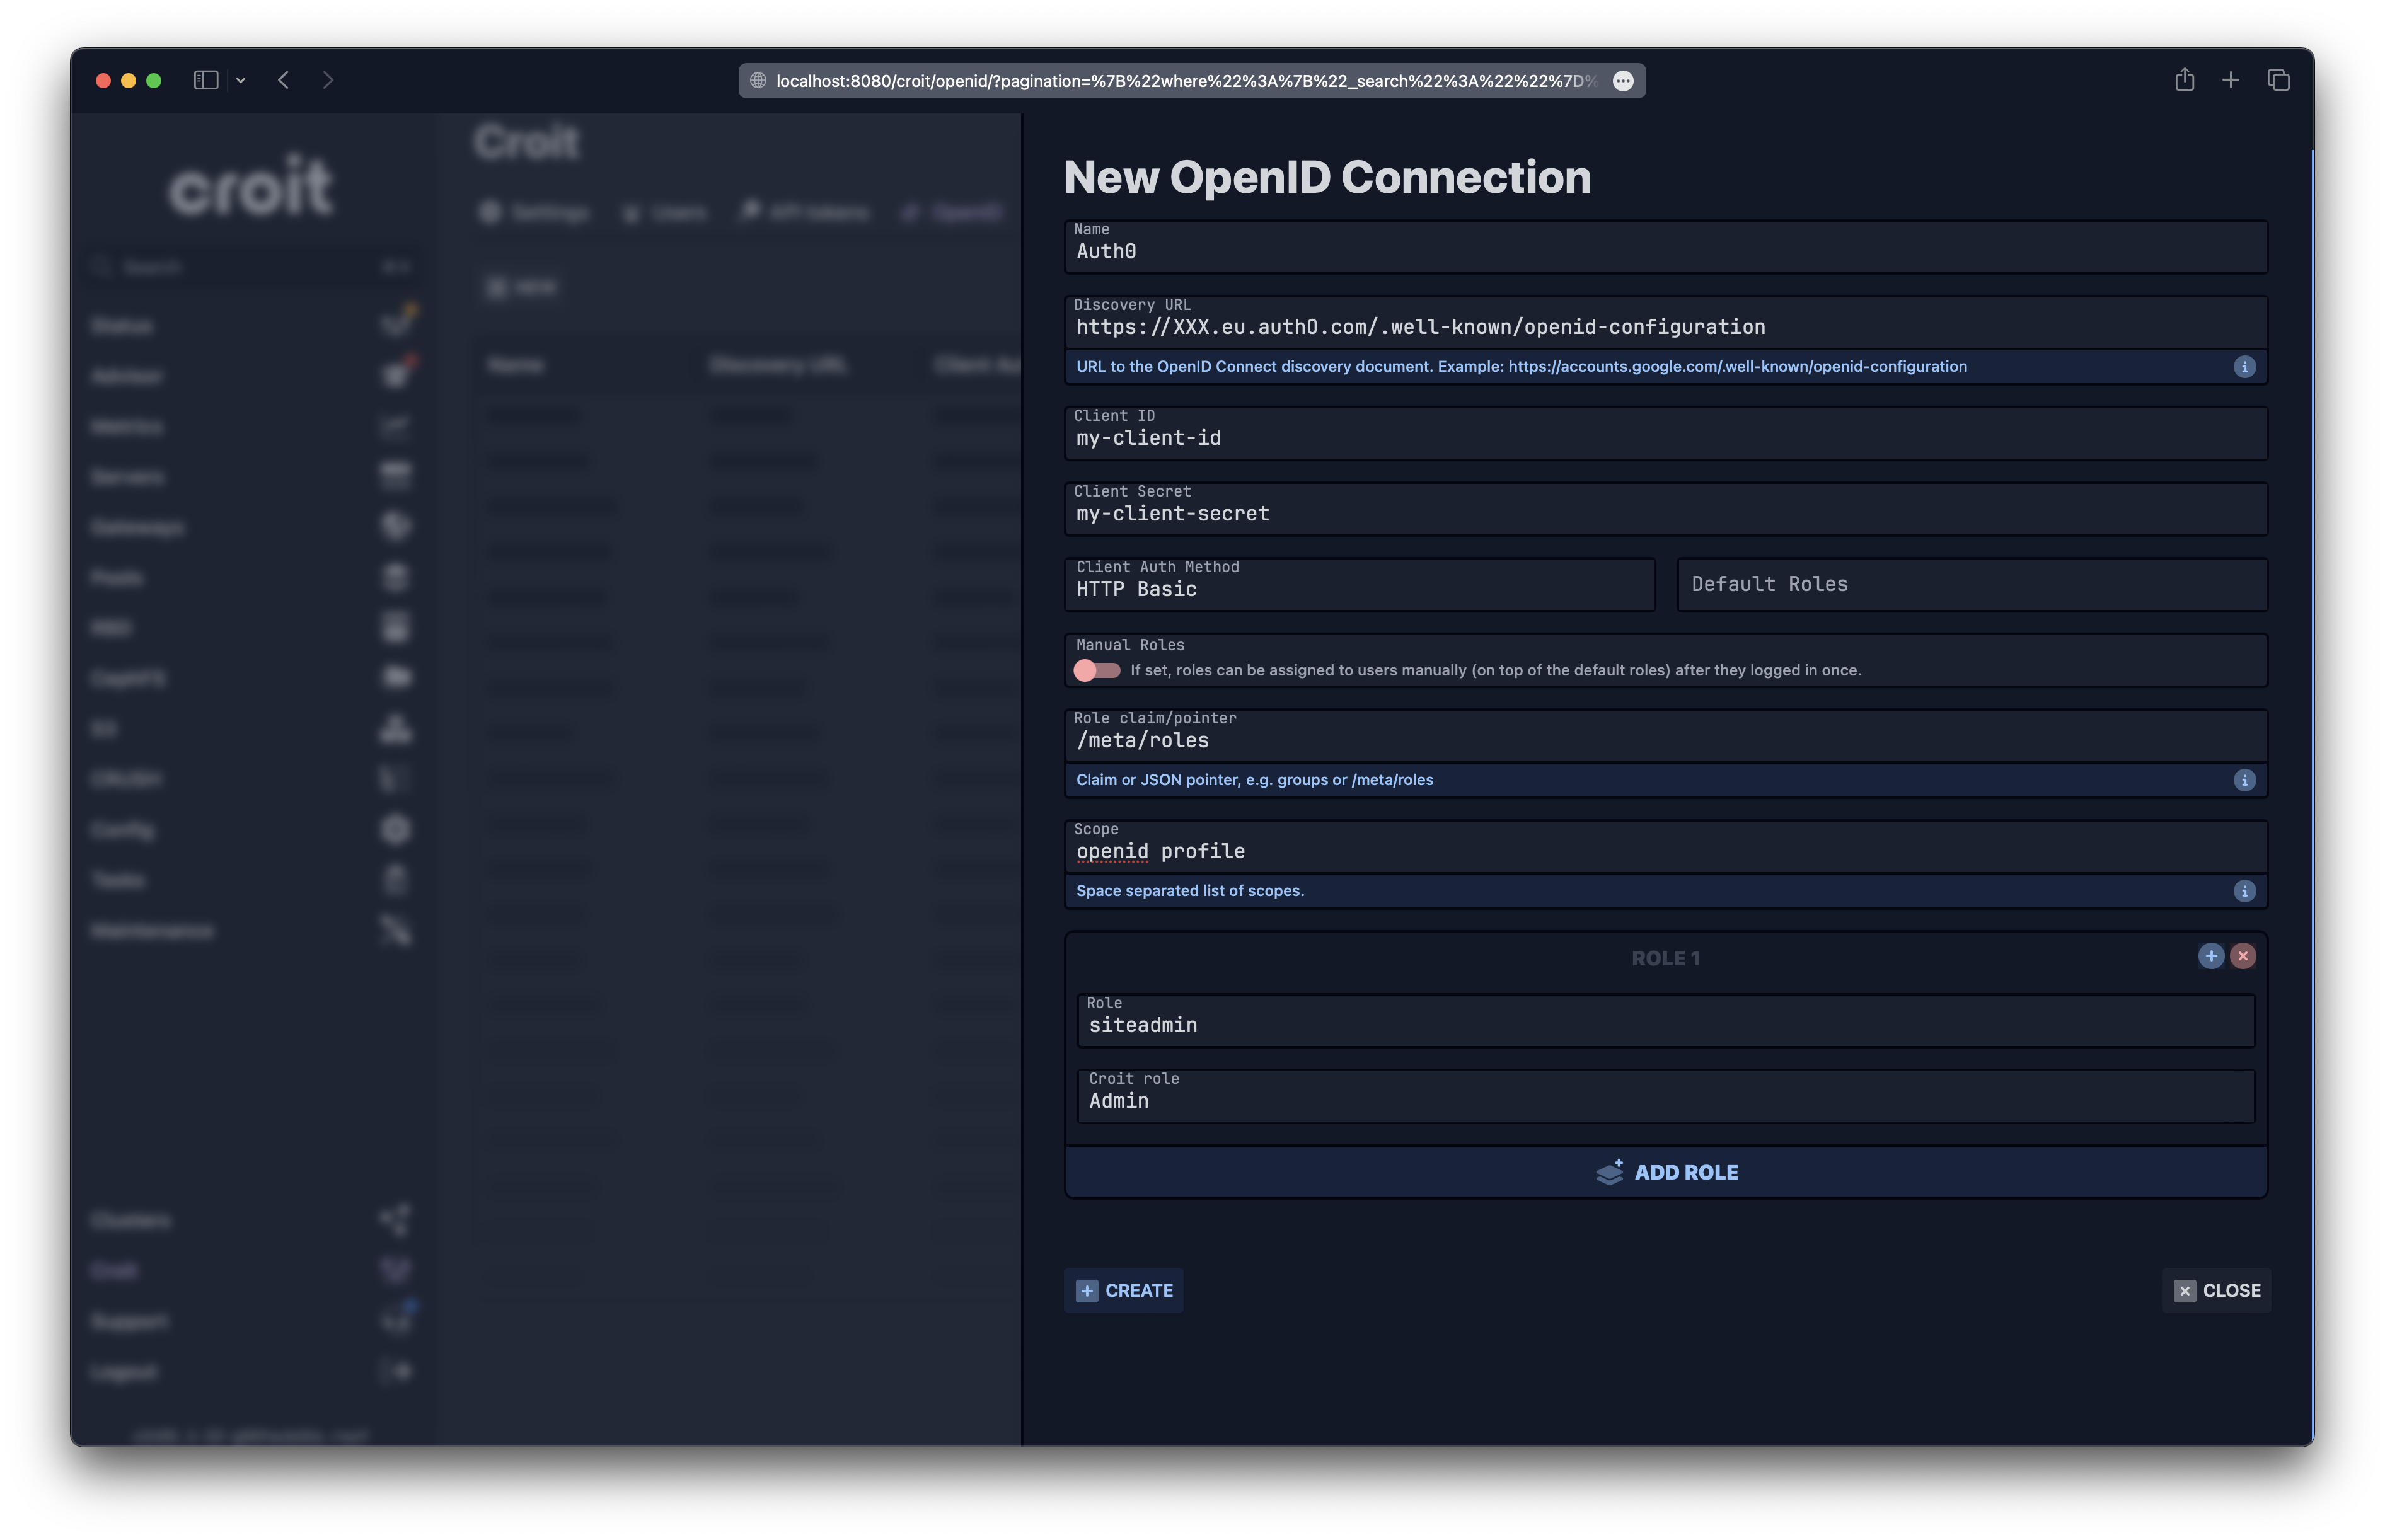 Auth0
Auth0
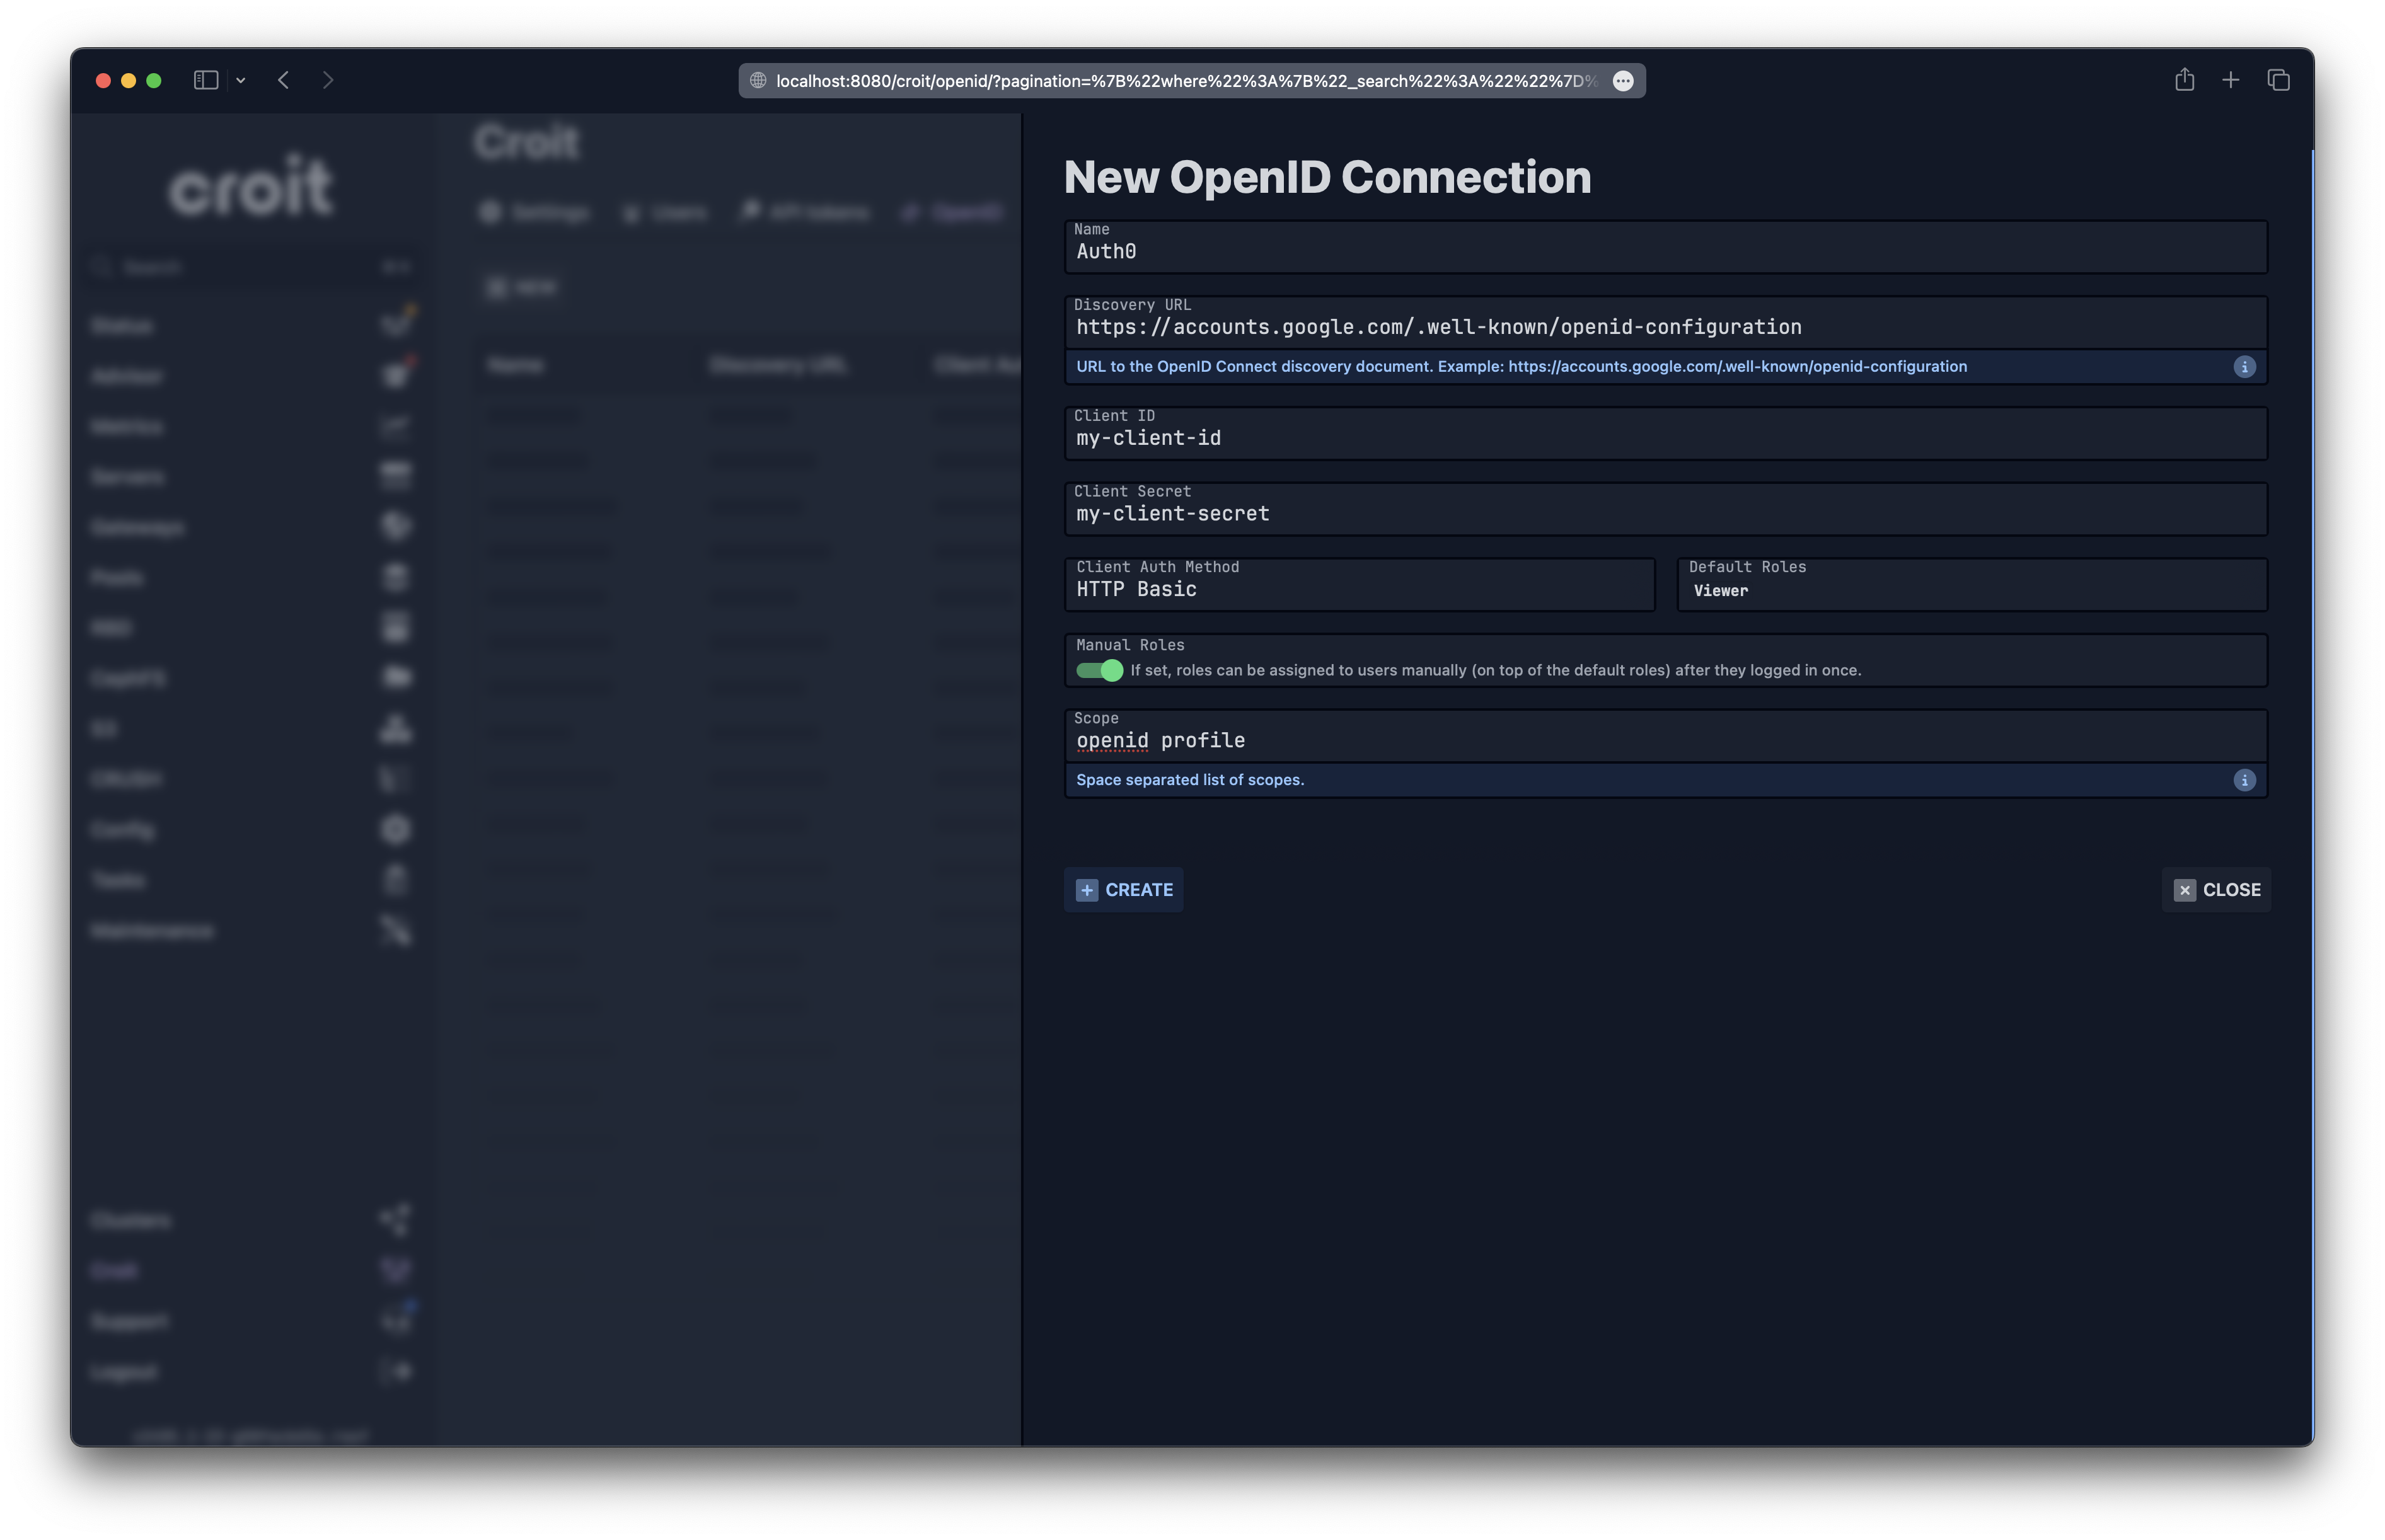 Google
Click Create, and croit will attempt to discover the new OIDC provider. Once that succeeded, you can now log in with your new provider. Users logged in via OIDC will be listed on the User Management page.
Troubleshoot OpenID Connect Configuration
OpenID Connect Discovery Failure
If OpenID Connect discovery fails or is not supported when adding a new OIDC provider, follow these steps:
-
Check Discovery URL:
- Ensure you have provided the correct discovery URL in croit. This URL is typically named “discovery URL” or “configuration URL” in your OIDC provider's settings.
- Double-check the URL format and correctness. You can also search for this URL in your provider’s documentation or online resources.
-
Self-Hosted Discovery Information:
- If your OIDC provider doesn’t support OIDC discovery, you need to host the discovery information yourself.
- Place the OpenID configuration JSON into
/config/extra-files/openid-configuration-exampleinside the croit Docker container. - Configure your OIDC provider using the discovery URL
https://your.croit.server/api/extra-files/openid-configuration-example.
Role Mapping Issues
If role mapping isn’t working as expected, follow these steps to enable debug logging:
-
Enable Debug Logging:
- Use the Ceph Admin Shell to enable debug logging:
curl -X POST localhost:8081/tasks/log-level -d "logger=io.croit.auth.OidcUserInfo&level=DEBUG" - This command enables debug logging specifically for OIDC user info.
- Note: Debug logging may contain GDPR-relevant information, so use it with caution and ideally with testing/debugging users.
- Use the Ceph Admin Shell to enable debug logging:
-
Verify Role Claims:
- Log in with your OIDC provider, preferably using a debugging/testing user.
- Check the docker logs for croit using:
curl --silent -XGET --unix-socket /var/run/docker.sock http://localhost/containers/croit/logs?stdout=true\&follow=true --output - - Look for the user’s claims in the logs to verify if the role claim/JSON pointer is correct and if users are getting the expected roles assigned.
-
Disable Debug Logging:
- Once troubleshooting is complete, disable debug logging to reduce log verbosity:
curl -X POST localhost:8081/tasks/log-level -d "logger=io.croit.auth.OidcUserInfo&level=INFO"
- Once troubleshooting is complete, disable debug logging to reduce log verbosity:
LDAP / AD
For LDAP you have adjust the /config/config.yml inside the croit container.
# /config/config.yml

ldap:
  # URL of your LDAP server
  url: ldap://ad.example.com
  # enable AD-specific query functionality for improved performance and support for nested groups
  isActiveDirectory: no
  # whether to use TLS, default is yes
  tls: yes
  # whether to validate certificates, default is yes
  verifyCertificateChain: yes
  # follow referrals
  referrals: IGNORE/FOLLOW

  # croit binds to this DN to look up users and group members
  bindDN: CN=croit-service-user,OU=service,OU=accounts,OU=example,DC=ad,DC=example,DC=com
  bindPassword: secretPassword

  # base for user lookups on login
  base: OU=users,OU=accounts,OU=example,DC=ad,DC=example,DC=com

  # name of the attribute used to search for users and the class name for users
  # defaults are sAMAccountName/user
  # the resulting ldap query looks like this: (&($uidAttributeName=$username)(objectClass=$userClassName))
  uidAttributeName: sAMAccountName
  userClassName: user

  # name of the attribute for the group(s) a user belongs to
  memberOfAttributeName: memberOf

  # the full distinguished names of groups that are mapped to admin/viewer roles
  adminGroupDN: CN=ceph_admins,OU=groups,OU=example,DC=ad,DC=example,DC=com
  viewGroupDN: CN=ceph_viewers,OU=groups,OU=example,DC=ad,DC=example,DC=com
Once you applied the changes to the config file, you will have to restart the container. Then you should be able to login using LDAP.